Category Archives: Software

Live Growing Virtual Disks In HyperV 2012R2

This is a new feature instroduced in HyperV 2012R2.  Previous to R2 the virtual machine had to be shutdown prior to resizing the VHDX file (VHD does NOT support this). Quite a hassle if you are a non-stop-shop! The process is a little different if you need to Grow or Shrink the volumes but i’ll step you all the way through!

Lets start by Live Growing the disk!

  1. On the HyperV server, start PowerShell (PS) as Administrator
  2. Locate your VHD(X) file.
  3. Assume we want a new size of 20GB, type “Resize-VHD <filename> -SizeBytes 20GB”, hit Enter and relax.
  4. When PS is done the new size will be 20GB. Easy!
  5. Now log on to the guest VM.
  6. Type “Windows+R” and in the Run dialog type “diskmgmt.msc” and hit Enter.
  7. In Disk Management locate the disk to Grow and note that there should be some “white” space available to the right side of the bar.
  8. Right click on the partition and select “Extend Volume…”, Next, Select new size, Next, Finish
  9. Now allow windows to repartition the drive for you, this should go quite fast. And you’re set. Check the new size in explorer.
  10. If you want to, steps 6-9 can be replaced with the new kid on the block, the mighty PowerShell
    1. Start PowerShell as Administrator
    2. Type “Get-Volume”, take note of the driveletter
    3. Setup a variable, Type “$newsize=(Get-PartitionSupportedSize – DriveLetter <DriveLetter>”
    4. OPTIONAL: Check that the variable contains data, Type “write-host $newsize”
    5. Resize partition, Type “Resize-Partition -DriveLetter <DriveLetter> -Size $newsize.sizemax
    6. Type “Get-Volume” and verify size! Done!


DFS Namespace and Replication

There seems to be virtually no information regarding this issue on the web so I’ll post this as note2self.

======== SITE SETUP ==========

We are a 2 site setup, SiteA in europe and SiteB in asia. SiteA is the HQ and SiteB has a lot of subcontractors working there with AutoCad files.

– At SiteA we have a server hosting a share with a lot of files and folders, I will simplify the structure to [\\ServerA\Data\Subfolder1\Subfolder2\Subfolder3].

– SiteA also has DFS-N setup as [\\domain.local\SiteA\Data] pointing to [\\ServerA\Data]. This allows all users regardless of site to access ServerA’s data through DFS-N.

Contained in [Subfolder3] is large data that we would like to replicate to SiteB to speedup data access for asia users. So we have setup a share on SiteB [\\ServerB\DFSData\Subfolder3] and are using DFS-R to replicate data to that share from [\\ServerA\Data\Subfolder1\Subfolder2\Subfolder3]. This works fine. All files are replicated.

We also setup a common drive mapping for both sites [G:\] that uses DFS-N path [\\domain.local\SiteA\Data] as entry point. This means that both sites now can access [Subfolder3] through [G:\\Subfolder1\Subfolder2\Subfolder3].

========= SITE SETUP END ==========

It seem DFS-N and DFS-R must use the same entry path for DFS to access the correct server. This demands using two (2) drive mappings to solve the above problem. Let me make a simple example from the post above.

CORRECT use of DFS-N/R to solve OP problem

Mapped Drive 1: G:\ = \\domain.local\SiteA\Data

  • DFS-N Path: \\ServerA\Data
  • DFS-N: \\domain.local\SiteA\Data
  • DFS-R: Not activated on this DFS-N

Mapped Drive 2: R:\ = \\domain.local\SiteA\Subfolder3

  • DFS-N Path: \\ServerA\Data\Subfolder1\Subfolder2\Subfolder3
  • DFS-N Name: \\domain.local\SiteA\Subfolder3
  • DFS-R Pri: \\ServerA\Data\Subfolder1\Subfolder2\Subfolder3
  • DFS-R Sec: \\ServerB\DFSData\Subfolder3

NON WORKING EXAMPLE

Mapped Drive 1: G:\ = \\domain.local\SiteA\Data

  • Share: \\ServerA\Data
  • DFS-N: \\domain.local\SiteA\Data
  • DFS-R Pri: \\ServerA\Data\Subfolder1\Subfolder2\Subfolder3
  • DFS-R Sec: \\ServerB\DFSData\Subfolder3

The issue with DFS-N/R seems to be the need for the DFS-N path to match that of the DFS-R Pri replication path. When DFS-N path and DFS-R path are a miss math the DFS Client on the workstations does not locate the locally replicated files (even thouth they are in fact replicated to ServerB).

Hope this can help anyone in the future!

Good luck with you DFS project

Windows 7 as Mobile Broadband router/gateway

Setting up Windows 7 as a gateway/router for a mobile broadband connection is simple, if you just understand what is going to happen. At the moment of writing this I’m currently using this solution for internet access as my ADSL land line is down and I wanted a solution that ment minimal impact on my home setup.


What we are going to do in 3 simple steps

  1. Setup a computer with Window 7 to share a mobile broadband connection through a Huawei modem. (This will be the gateway/router)
  2. Reconfigure all affected devices to access internet
  3. Surf surf surf!!!

Here we go!

  1.  Connect the dongle to the “gateway/router” computer.
  2. Verify internet access
  3. Open Network Settings and select the dongle adapter
  4. Right click and select properties
  5. Select “Share this connection” (THIS ONLY WORKS IF YOU HAVE 2 OR MORE ADAPTERS!!)
  6. Select the network that is on the “home/safe” side of the connection (you private LAN or WIFI)
  7. Done! Now Internet Connection Shring is enabled (ICS for short)
  8. Now the “home/safe” adapter has been DHCP Server enabled (beware if you have a DHCP server already!) and the adapter has been assigned the IP 192.168.137.1. The DHCP scope is 192.168.137.0/24.
  9. Now its time to set up the clients, manually!
  10. On the clients goto Network Settings and select the adapter you are currently using to access you network (LAN or WIFI)
  11. Manually set the following:
    1. IP: 192.168.137.xxx (select a number between 100-199 per client)
    2. Mask: 255.255.255.0
    3. Gateway: 192.168.137.1
    4. DNS: 192.168.137.1
  12. Now Surf!

To reset every thing to normal once you are done, just change all client adapters to DHCP and remove the “Share this connection” on the mobil broadband adapter.

Why set up IP manually u ask? Well, I want minimal interference with my current setup and this allows me to selectively assign internet access to clients based on how good a connection to 3G/4G i have.


Good Links

ICS on Windows 7


Merge Differencing Disks in HyperV 2012R2 / 2012

Merging differencing disks in Hyper-V 2012R2 is as easy as diskpart. Our new best friend 🙂 Follow the steps below and be upp and running in no time!

NB! The parent and the child VHD(X) must be Read/Write and NOT connected to VM guest. If alls well the child vmdisk WILL be deleted from storage!

  1. Open CommandLine (cmd) as Admin
  2. Dig down to you’re differencing disk image (VHD/VHDX)
  3. Type “diskpart
  4. Type “select vdisk file=<path to differencing disk image>
  5. Type “merge vdisk depth=1

How can this be?
When you create a differencing disk, there’s a parent-child relationship between the Virtual Hard Disk (VHD) files. The differencing disk contains only the changes from its master disk.

Migrate DHCP from Windows Server 2003 to Server 2012

This guide will crash course you on migrating DHCP from 2003 to 2012. Basic admin knowledge is advisable.

  1. First install DHCP services on Server2012
  2. Authorize the new DHCP server on the domain
  3. Validate the authorization
    1. On the old server execute this command in prompt:
      netsh dhcp show server
    2. Check that BOTH servers are listed
  4. On the old Server 2003 export the current DHCP configuration
    1. netsh dhcp server <\\servername> export <c:\filename> all
  5. On the new Server 2012, import the DHCP configuration
    1. Shutdown DHCP service
    2. Delete c:\windows\system32\DHCP\dhcp.mdb
    3. Start the DHCP service
    4. netsh dhcp server <\\servername> import <c:\filename>
    5. Restart DHCP service

Now you’re done!

Source: Technet Blogs

Restoring a RAID array on Linux (mdadm)

01. Check the status of the raid:
# sudo mdadm –detail /dev/mdX
OR
# sudo cat /proc/mdstat (locate _ in the UUUU section)

02. Locate the broken disk:
# sudo cat /dev/sdX > nul (check HDD led for flashing/permanent light)
# sudo hdparm -i /dev/sdX | grep -i “serialno”

03. Remove the failed drive
# sudo halt
Replace drive (take note of serial number)

04. Locate the new drive
# sudo hdparm -i /dev/sdX | grep -i “serialno”
ex /dev/sdc

05. OPTIONAL: Partition the drive (GPT)
# sudo parted /dev/sdc
parted> mklabel gpt
parted> mkpart primary KB/GB GB

06. Add drive to broken raid
# sudo mdadm /dev/mdX –add /dev/sdc

07. Check status of RAID rebuild
# sudo mdadm –detail /dev/mdX
OR
# sudo cat /proc/mdstat
OR/AND
nmon (to check disk activity)

Now we are done!

Changing network type Win8/Server2012

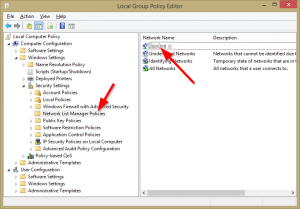
Changing the network type on Win8/Server2012 has change since Win7. Now you have to switch this in local group policy intead. Here is a step-by-step how to change it:

  1. Type WinKey+R
  2. Type gpedit.msc, hit enter
  3. Browse down to Computer Configuration > Windows Settings > Security Setting > Network List Manager Policies
  4. Dubbelclick on you desired network
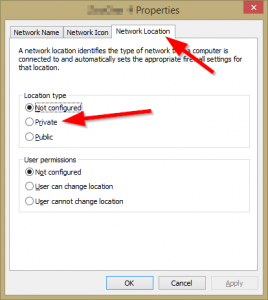
  5. Click on tab “Network Location”
  6. Under “Location Type” set the value that you want.
  7. Close gpedit.msc

Now your all done

1-Local Group Policy Editor 2- Properties

Home Folder Rights

So, I always forget this stuff but setting good home folder rights is THE way of automating home folder creating from AD to a share or allowing users to create backupfolders on any share basically.

Link to the source site: Technet Blog AD Team + my own tweaks

1. Turn off inheritance on the folder and copy the permissions. You do this by:

a. Click the Advanced button found on the Security tab.
b. Clear Allow inheritable permissions to propagate to this object check box in the Advanced Security Settings dialog box.
c. Click Copy when prompted by the Security dialog box.

2. Click OK to return to the Security tab. Ensure we have the following permissions set and remove all others:

Administrators: Full Control (This folder, subfolders and files)
System: Full Control (This folder, subfolders and files)
Creator Owner: Full Control (Subfolders and files only)
Authenticated Users: Special (This folder only)

3. Change permissions for Authenticated Users and Creator Owner to match step 2. Now they cannot access other users’ folders but are allowed to create new ones on the top level. You do this by:

a. Click Advanced on the Security tab.
b. Click Authenticated Users and then click Edit.
On the Applies to dropdown, select This Folder Only and Check the following boxes:
Traverse Folder / Execute File
List Folder / Read Data
Read Attributes
Read Extended Attributes
Create Folder / Append Data
Read Permissions
c. Click OK
d. Now click Creator Owner and then click Edit
On the Applies to dropdown, select Subfolders and Files only and Check the following boxes:
Full Control
e. Click OK twice.

Good security practice would also be to enable ABE (Access Based Enumeration) on Server2003 and later. This will “hide” all shares that a user does not have permission to read. I like ABE, you should to. As a sidenote it seems that Oracle Solaris is also capable of Windows compatible ABE on *nix shares, very cool!


Now you are done!

Truecrypt, goodby security friend (now hosted!)

It seems that the Truecrypt Foundation dropped a bomb on the security community on April 14th 2014, releasing v7.2 of Truecrypt that was crippled to only being able to read encrypted data…. Well fortunatly I will be hosting 7.1a (the last fully functional Truecrypt version released) as soon as i have validated some unofficial downloads to the one I have installed from the official installer. I’ll update this post when possible.

UPDATE!

Now you can download all the TrueCrypt binaries for Win/Linux below. The archive (7-zip) contains binaries and PDF documentation. All files have a PGP signature file and have been SHA256 hashed. Enjoy!

TrueCrypt v7.1a Download